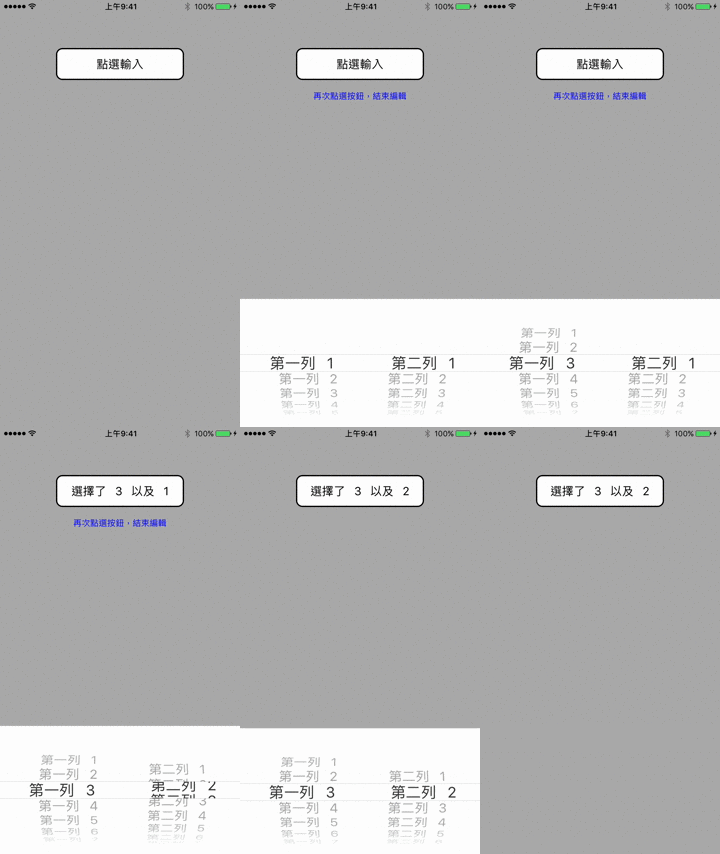
UIPickerView 自訂選擇器

加入協定
class ViewController: UIViewController, UIPickerViewDelegate, UIPickerViewDataSource {
宣告資料
var pickview = UIPickerView()
var button = UIButton()
var label = UILabel()
let number = Array(1...20) // 宣告資料陣列, 用於設定UIPickerView
let WIDTH = UIScreen.main.bounds.size.width
let HEIGHT = UIScreen.main.bounds.size.height
viewDidLoad
背景顏色
view.backgroundColor = .lightGrayUIPickerView
    pickview.frame = CGRect(x: 0,
                            y: HEIGHT,
                            width: WIDTH,
                            height: 200)
    pickview.delegate = self
    pickview.backgroundColor = .white
view.addSubview(pickview)
UIButton(觸發UIPickerView)
    button.frame.size = CGSize(width: 200,
                               height: 50)
    button.center = CGPoint(x: WIDTH / 2,
                            y: 100)
    button.backgroundColor = .white
    button.setTitle("點選輸入",
                    for: .normal)
    button.setTitleColor(.black,
                         for: .normal)
    button.layer.cornerRadius = 10
    button.layer.borderWidth = 2
    button.layer.borderColor = UIColor.black.cgColor
    button.addTarget(self,
                     action: #selector(buttonpressed),
                     for: .touchDown)
view.addSubview(button)
UILabel(給予使用者提示)
    label.frame.size = CGSize(width: 200,
                              height: 20)
    label.center = CGPoint(x: WIDTH / 2,
                           y: 150)
    label.text = "再次點選按鈕,結束編輯"
    label.textColor = .blue
    label.textAlignment = .center
    label.font = UIFont.systemFont(ofSize: 13)
    label.isHidden = true
view.addSubview(label)
UIPickerViewDelegate、UIPickerViewDataSource
// 列數
func numberOfComponents(in pickerView: UIPickerView) -> Int {
    return 2
}
// 內容數量
func pickerView(_ pickerView: UIPickerView, numberOfRowsInComponent component: Int) -> Int {
    return component == 0 ? number.count : number.count - 10
}
// 內容文字
func pickerView(_ pickerView: UIPickerView, titleForRow row: Int, forComponent component: Int) -> String? {
    return component == 0 ? "第一列   \(number[row])" : "第二列   \(number[row])"
}
// 選擇時觸發
func pickerView(_ pickerView: UIPickerView, didSelectRow row: Int, inComponent component: Int) {
    let first = number[pickerView.selectedRow(inComponent: 0)]
    let second = number[pickerView.selectedRow(inComponent: 1)]

    button.setTitle("選擇了   \(first)   以及   \(second)",
                    for: .normal)
    button.setTitleColor(UIColor.black,
                         for: .normal)
}
按鈕點選動作
func buttonpressed(sender: UIButton) {
    pickview.frame.origin.y == self.HEIGHT ? viewslide(false) : viewslide(true)
}
選擇器滑動動作
func viewslide(_ BOOL: Bool, completion: ((Bool) -> Void)! = nil) {
    UIView.animate(withDuration: 0.3,
                   delay: 0,
                   options: [.curveEaseInOut],
                   animations: { () -> Void in
                    self.pickview.frame.origin.y = BOOL ? self.HEIGHT : self.HEIGHT - 200
                    self.label.isHidden = BOOL
                    },
                   completion: nil)
}
更多常用設定
// 列寬
func pickerView(_ pickerView: UIPickerView, widthForComponent component: Int) -> CGFloat {
    return 100
}
// 行高
func pickerView(_ pickerView: UIPickerView, rowHeightForComponent component: Int) -> CGFloat {
    return 100
}
// 內容圖片
func pickerView(_ pickerView: UIPickerView, viewForRow row: Int, forComponent component: Int, reusing view: UIView?) -> UIView {
    //let image = UIImage?
    //UIImageView().image = image
    //return UIImageView()
}
下載完整範例 OneDrive